Minecraft Roof Designs - Building Creative Covers
Building in your blocky world is a really fun thing to do, and one part that can sometimes feel a bit tricky is making the top of your structures look just right. A good roof does more than just keep the rain out; it gives your creation its own special feel, you know? It helps define the whole shape and look of a place, making it stand out from other things you might build, or so it seems.
Plenty of people who spend time building things in this particular block game, like the 7.4 million who gather in one big community, often talk about how important the roof is. It is that finishing touch, the part that brings all the walls and foundations together into something complete. Getting it to work well, both in how it looks and what it does, can be a little puzzle, yet it is a rewarding one.
This little chat will go over some ideas for making your roof truly shine, covering practical tips for keeping unwelcome guests off your property and ways to make the top of your building visually interesting. We will talk about how different blocks can make a big difference, and perhaps even how to get those tricky curved shapes to appear, or so you might find.
Table of Contents
- How Do You Keep Minecraft Roof Designs Safe From Spawns?
- Does Material Choice Matter for Minecraft Roof Designs?
- Using Polished Blocks for Minecraft Roof Designs
- What About Adding Balconies to Your Minecraft Roof Designs?
- Finding Room Inside Your Minecraft Roof Designs
- Are Curved Minecraft Roof Designs Possible?
- Working with Domes in Minecraft Roof Designs
- Getting Those Tricky Minecraft Roof Designs Just Right
How Do You Keep Minecraft Roof Designs Safe From Spawns?
One common worry for anyone building a roof is keeping it free of monsters, or so it appears. Nobody wants a creeper waiting for them on their own roof, do they? The straightforward method of just putting torches everywhere can feel a bit messy, not really matching the look you are going for, you know? There are ways to make your roof a safe spot without making it look like a lighting store, which is pretty neat.
One good trick for keeping those creatures from appearing on your minecraft roof designs is to use half-slabs. Mobs cannot appear on top of half-slabs, which makes them a really useful building material for roofs. You can make a roof entirely out of top half-slabs, and it will be completely safe from monster appearances, that is a fact. This works for many types of half-slabs, letting you keep the look you want while adding a layer of safety, which is a big plus.
Another idea for your minecraft roof designs involves placing light sources in smart spots. Instead of just putting torches on the surface, you could try putting them under transparent blocks like glass or glowstone. This lets light through but keeps the light source hidden, giving a cleaner look. You could also put light blocks inside the roof structure itself, perhaps tucked away in corners or behind some kind of decorative element, so the light spreads without being too obvious, which helps a lot.
You can also use carpets. Mobs cannot appear on carpets, just like with half-slabs. So, if you have a flat or gently sloped roof, putting carpets down can make it safe without changing the shape of your minecraft roof designs too much. This works well for areas you might walk on, or for parts of the roof that are mostly flat, offering a simple way to add safety to your building, you see.
Does Material Choice Matter for Minecraft Roof Designs?
Sometimes, a roof might look a little off, and you might wonder why. It could be that the materials used for the roof and the main walls are too similar, or so it often happens. When your roof and walls are made from the same kind of block, the building can sometimes blend together too much, making it hard to see where one part ends and another begins. This can make the whole structure seem a bit flat, or just not as interesting as it could be, that is the thing.
To make your building stand out, try using different blocks for the roof than you use for the walls. This contrast in materials can make the roof really pop, giving your building a lot more character. For example, if your walls are made of light stone, a darker wood or a different color of stone for the roof can create a nice visual break. This difference helps to define the shape of your minecraft roof designs, making it a clear part of the whole picture, you know?
Thinking about texture is also helpful when picking materials for your minecraft roof designs. Some blocks have a smooth surface, while others have a rougher, more detailed look. Mixing these textures can add depth to your building. Imagine a smooth wall with a roof made of blocks that have more bumps and lines; this can make the roof feel more substantial, or perhaps even more like a real roof, which is pretty cool.
Color is another big factor. Even if you stick to similar types of blocks, choosing different shades can make a huge impact. A roof in a slightly different color from the walls can draw the eye upwards, highlighting the top of your building. This simple change can make your entire structure feel more complete and well-thought-out, giving your minecraft roof designs a truly finished appearance, which is quite nice.
Using Polished Blocks for Minecraft Roof Designs
When it comes to specific blocks, some builders really like using polished andesite. It creates a pleasing tiled look, almost like a real roof with individual pieces, which is kind of neat. This block has a nice, smooth surface that can give your minecraft roof designs a clean and refined feel. It is a good choice for many types of builds, from simple homes to more grand structures, offering a consistent and attractive pattern.
However, relying only on polished andesite for your minecraft roof designs can become a little uninteresting after a while. If every part of your roof is the same, it might not have as much visual interest as it could. To keep things fresh, it is a good idea to mix in other designs or materials. This could mean using different blocks for trim, or creating patterns within the polished andesite itself, to break up the sameness, you see.
Some builders also enjoy using polished diorite. This block has a brighter, almost white appearance, which can be a striking contrast to darker walls. It can also create a tiled pattern, similar to andesite, but with a different color scheme. Combining polished diorite with stone bricks or chiseled stone bricks is another popular approach. Stone bricks offer a classic, sturdy look, while chiseled stone bricks add a touch of detailed texture, making your minecraft roof designs more complex and pleasing to the eye, or so it often appears.
Mixing these blocks allows for a lot of creative freedom. You could use polished diorite for the main roof area and then use stone bricks for the edges or for a pattern in the middle. Chiseled stone bricks could be used as accents, perhaps around windows in the roof or at the peak. This kind of mixing helps to add variety and detail to your minecraft roof designs, making them much more engaging to look at, which is a great thing.
What About Adding Balconies to Your Minecraft Roof Designs?
Sometimes, a roof can have parts that stick out, or "jutting bits," and these can sometimes make the roof seem a bit complicated. One idea to make these areas feel more natural, or even simplify the overall look of your minecraft roof designs, is to add a balcony. A balcony can give a purpose to those parts that stick out, turning what might seem like an odd shape into a functional and pretty feature, which is a clever move.
A balcony on a jutting part of your roof can provide a nice spot to look out over your world. It also breaks up the large surface of a roof, adding a new layer of visual interest. Instead of just a big, flat or sloped area, you get a little outdoor space that adds to the story of your building. This can make your minecraft roof designs feel more inviting and lived-in, or so it seems.
When you put a balcony on your roof, you also get a chance to use different materials for the balcony itself, which can add more contrast and detail. For instance, if your roof is made of stone, the balcony could be made of wood, with some fences or railings. This creates a pleasing visual break and makes the balcony stand out as its own special area, making your minecraft roof designs more dynamic, you know.
Balconies can also help with the flow of your building. They can connect different parts of a structure, or provide access to different levels. Think of it as a little extension of your living space, but outside and on top of your house. It is a way to use the roof not just as a cover, but as an active part of your home, making your minecraft roof designs feel more useful and integrated, which is pretty neat.
Finding Room Inside Your Minecraft Roof Designs
Many people might not fully realize how much usable space you can actually get inside a roof. It is easy to think of a roof as just a solid cap on your building, but often, there is a lot of empty room up there that you could use. This space, often called an attic or loft, can be turned into extra rooms, storage areas, or even secret spots, which is a pretty cool thought.
To make the most of the space within your minecraft roof designs, you might need to think about the shape of your roof. A steeper roof, for example, will generally give you more head room inside than a very flat one. By planning for this internal space from the start, you can build walls and floors inside the roof structure, creating proper rooms that are just as usable as any other part of your house, which is a smart way to build.
Consider adding windows or skylights to these roof rooms. This brings in natural light and makes the space feel less like a cramped attic and more like a comfortable living area. These openings can also add to the outside appearance of your minecraft roof designs, giving them more detail and making them look more inviting, you see.
This approach to using the roof space can make your building feel bigger without actually expanding its footprint on the ground. It is a clever way to add more functionality to your base, whether you need an extra bedroom, a quiet study, or just a place to store all your extra items. So, when you plan your minecraft roof designs, remember to look up and think about the space above, because there might be more room than you think, which is a good thing to remember.
Are Curved Minecraft Roof Designs Possible?
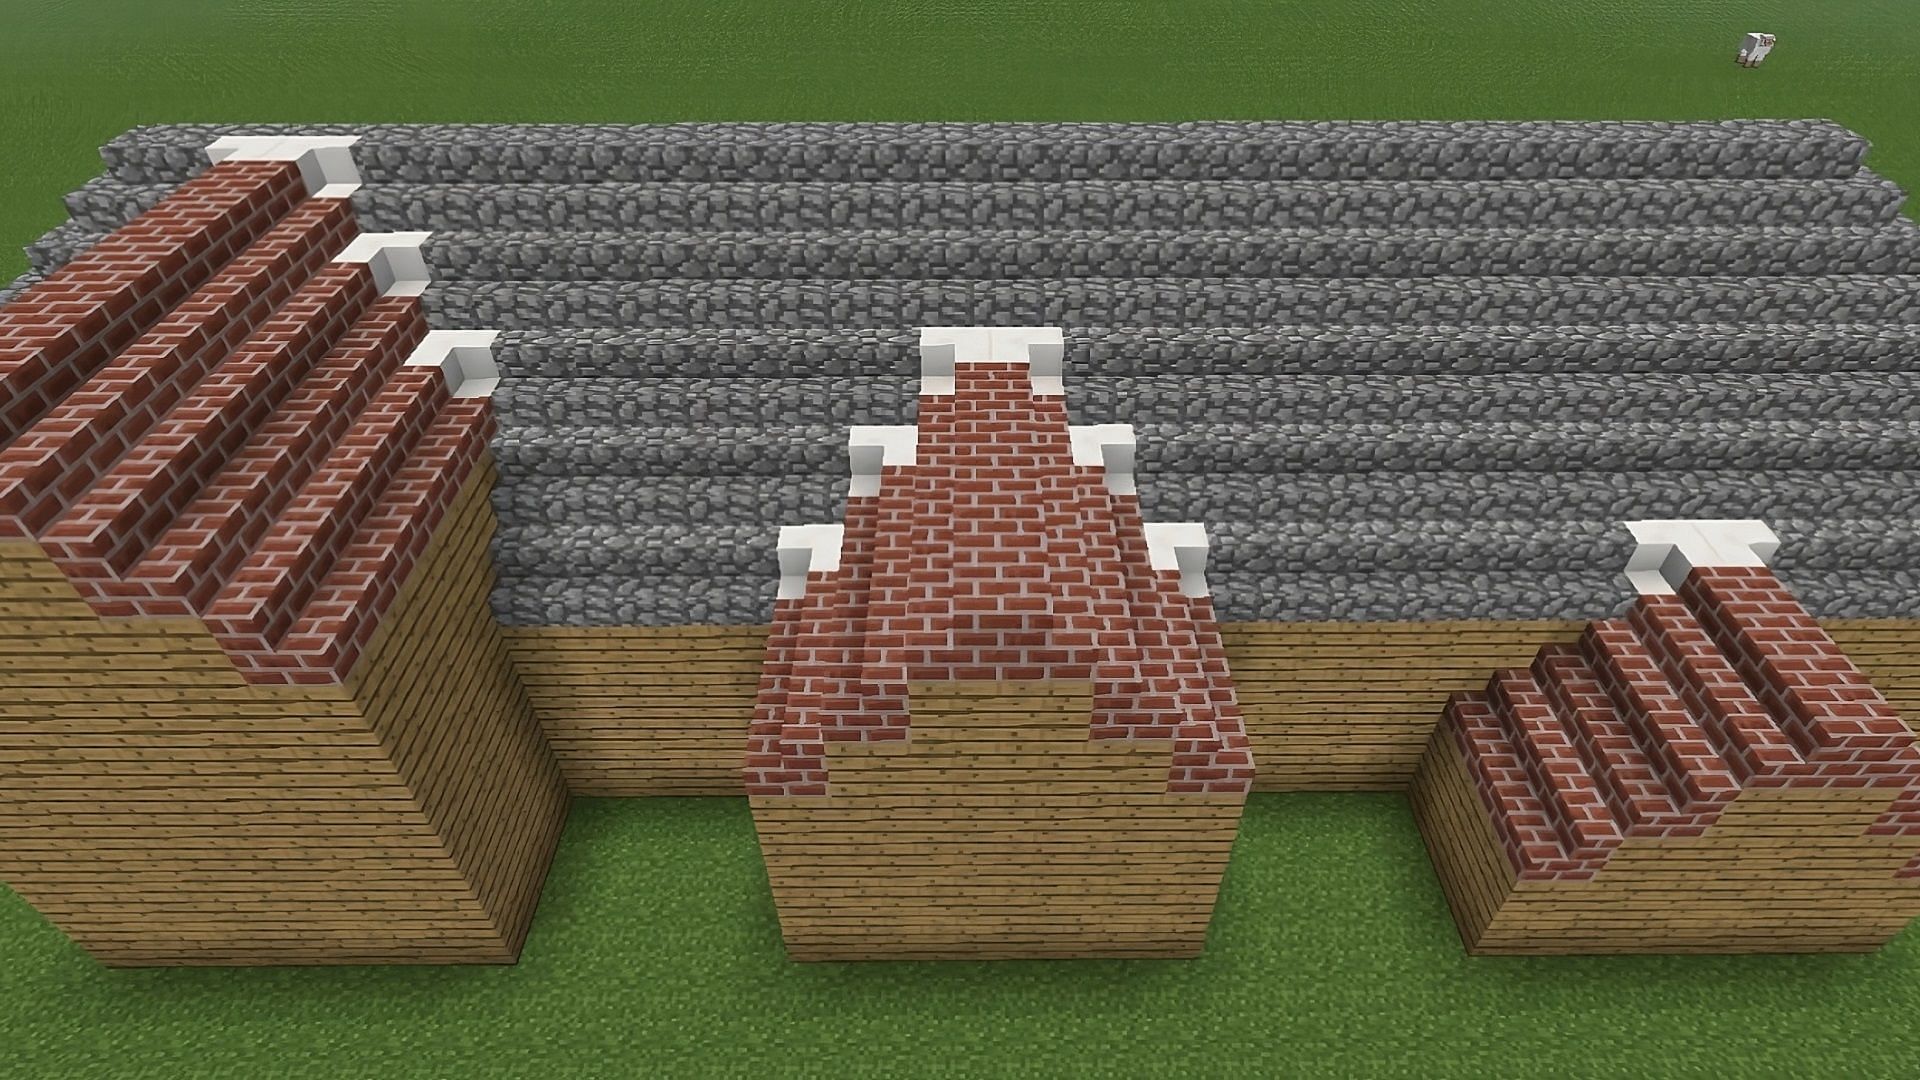
One of the more challenging things builders try to create is a curved roof, especially those that have a smooth, almost exponential bend. It can be quite a puzzle to figure out how people achieve these flowing shapes using square blocks, or so it often seems. The very nature of the game's blocks makes smooth curves difficult, but with some clever thinking and patience, it is certainly something you can work towards, which is encouraging.
For making curved minecraft roof designs, the trick often involves using stairs and slabs. These blocks are smaller than full blocks and have different shapes, which allows for more gradual changes in height and position. By carefully placing stairs and slabs, you can create the illusion of a curve, even though it is still made of straight lines, or so it appears. It is about making small steps that, from a distance, look like a continuous bend.
Thinking about the overall shape you want is the first step. If you want a gentle curve, you might use more slabs and fewer stairs. For a sharper curve, you might use stairs more often. It is a process of trial and error, placing blocks, stepping back to look, and then adjusting. This kind of building takes a bit of practice, but the results can be really stunning for your minecraft roof designs, which is a nice reward.
There are many online guides and pictures that show different patterns for making curves. Looking at how other builders have done it can give you a good starting point. You can then adapt those patterns to fit your own building and your own style. Remember, even a slightly curved roof can add a lot of character to your structure, making your minecraft roof designs feel more organic and interesting, which is pretty cool.
Working with Domes in Minecraft Roof Designs
Domes are another type of curved roof that can be very tricky to build in the game. Getting a perfectly round or semi-spherical shape using square blocks requires a very precise approach. Many builders find themselves scratching their heads when trying to figure out how to make these rounded tops, or so it is often heard. It is a bit like trying to draw a circle with only straight lines, but it can be done with the right method.
Just like with other curved minecraft roof designs, stairs and slabs are your best friends when building a dome. You will typically start with a circular base, then gradually build up layers, using stairs and slabs to reduce the size of each layer as you go higher. This creates the rounded effect, with each block contributing to the overall curved shape, which is a smart way to do it.
There are many patterns and guides available online for building domes of different sizes. These often involve specific block counts for each layer, helping you achieve a smooth curve. Following one of these patterns can save you a lot of time and frustration, especially when you are just starting out with dome building. It gives you a clear path to follow for your minecraft roof designs, you see.
The bigger the dome, the smoother it can look, because you have more blocks to work with for those small changes in shape. Smaller domes can sometimes look a bit more blocky, but they can still be very effective. Experimenting with different block types for your dome can also add to its appearance. Stone, wood, or even concrete can give your dome a different feel, making your minecraft roof designs truly unique, which is a great thing.
Getting Those Tricky Minecraft Roof Designs Just Right
Sometimes, it is not just about curves or specific blocks, but about making the whole roof feel right. This includes all sorts of shapes, from simple slopes to complex, multi-layered tops. The goal is often to make the roof look good while also being practical, or so many builders aim for. It is about finding a balance between looks and function, which can be a fun challenge.
Thinking about the overall shape of your building can help with your minecraft roof designs. A tall, thin building might look good with a very steep, pointed roof, while a wide, low building might suit a flatter, more spread-out design. The roof should complement the rest of your structure, making it feel like a complete and well-designed piece, you know?
Adding small details can also make a big difference. This could be things like chimneys, small windows that stick out from the roof (dormers), or even just decorative patterns made with different blocks. These little touches can add a lot of character to your minecraft roof designs, making them feel more intricate and thought-out, which is pretty cool.
Remember that building roofs is a creative process. There is no single "right" way to do it, and what looks good to one person might be different for another. The best way to get better is to keep trying new things, experimenting with different blocks and shapes. Every roof you build, whether it is simple or very complex, teaches you something new about how to make your minecraft roof designs truly shine, which is a very good thing.
This article has covered ideas for keeping your roofs safe from unwanted creatures, how choosing different materials for your roof and walls can make a building stand out, the use of polished blocks like andesite and diorite for interesting patterns, the benefit of adding balconies to break up roof lines, how much space you can find inside a roof for extra rooms, and some approaches to creating challenging curved roofs and domes.

Detail Author:
- Name : Golda Shanahan
- Username : sterling.hodkiewicz
- Email : orland78@doyle.net
- Birthdate : 1997-11-15
- Address : 597 Keagan Forge Suite 656 Taureanview, ME 72639-5912
- Phone : (629) 565-7094
- Company : Goodwin-Grant
- Job : Sports Book Writer
- Bio : Cum enim blanditiis debitis fugiat. Omnis non optio esse. Et enim fugiat voluptatem deserunt enim. Dolor deserunt quos voluptate rem repudiandae.
Socials
linkedin:
- url : https://linkedin.com/in/jwilliamson
- username : jwilliamson
- bio : Nobis mollitia dolorum quia nemo ut.
- followers : 5780
- following : 1360
tiktok:
- url : https://tiktok.com/@justyn5623
- username : justyn5623
- bio : Rerum nihil ea et. Ut voluptatem quo aut facilis.
- followers : 3776
- following : 1156
